Monday, 11 February 2013

Some days are a bit of a circus!

If someone were to ask me what cake I had for my 1stbirthday I really wouldn’t have a clue! Not because my mom didn’t make me something delicious, but who really remembers their 1st birthday?
 
Luckily for me in the past 2 months I’ve made a quite a few 1st birthday cakes and while I don’t remember my own 1st birthday cake, I’ll certainly remember theirs.


One of my last big cakes last year was this Winnie the Pooh cake. When the request came through to make this cake I happily accepted whilst having a mild heart attack as to how, with my limited artistic ability, I was going recreate the characters. Luckily I managed to find some premade characters which made my life a lot easier!


Cake in a number 1


Last week I had a panicked call from an old colleague asking me if I could please help her make a xylophone cake for her daughters birthday. She had ordered it from somewhere else and they'd let her down at the last minute.  It was a bit of a rush, but I was very happy with the end result, as was she!


This weekends project was a Circus themed cake with animal cupcakes. 
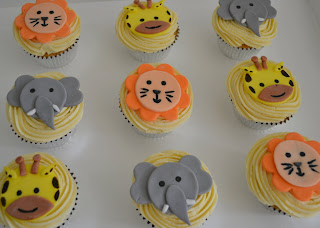
Animal cupcakesI decided to start with the animals for the cupcakes so that they could dry.  I then set about making the circus tent.  I had planned to use my giant cupcake cake tin but it just wasn't giving me the right shape.  I eventually settled on using the top of the cupcake tin and a normal round tin for the bottom.  Once i got the right shape the fun began!


The tent was boring before the bunting and doors were added, but this was a classic case of the little details making up the cake.  Once the animals were added, I just loved the end result and I think this is one of my favourite cakes.
Carnival cake

So while the birthday girls will only remember their cakes from pictures, I'll remember every detail that went into them all.


Monday, 28 January 2013

A mad hatter to start the year


The Sprinkles new year has started with a bang.  After a 3 week break, I arrived home to make cake pops before even unpacking my bags.  Cake pops by now, can be done with my eyes closed, however this past weekend had me challenging myself , my baking skills and my limited artistic ability!

I had a request to make a cake and cupcakes for a mad hatter themed kitchen tea. I love the theme and it is so easy to go overboard.

I started with the cupcakes as they’re quick to do and I knew how I wanted them to look.  I dedicated an afternoon to prepare the cupcake décor so it was just a matter of assembly

 
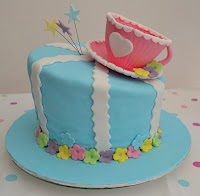
Tea cup cake


The cake was a bit more of a challenge, but after doing some online research, I saw an idea and decided to give the cake my own twist. In my head, the biggest challenge was going to be making the tea cup for the top of the cake. As it turned out, thanks to a silicone bowl the perfect teacup size, my cup ended up being quite simple to make.


Overall I’m really happy with how it all turned out.  I’m just glad I wasn’t around to watch my hat being demolished!


Monday, 10 December 2012

Newly aquired draping skills


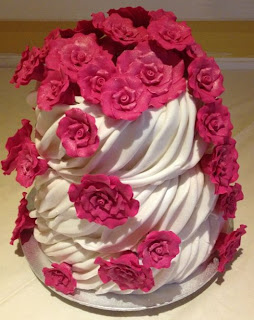
Two months ago I was asked to quote on an engagement cake.  I sent samples along with the quote and was promptly given the job of making a three tiered cake, draped with fondant and decorated with pink roses.

Cake with edible roses
Having never draped a cake before, I was quite excited to teach myself a new skill.  This past weekend was the delivery date and so the task began.  First step was obviously baking the cakes - the bottom tier is carrot cake, the middle is red velvet and the top tier is lemon cake.  Once the baking was done, the fun began.

I started with the smallest tier and after trying various techniques I finally settled on one that was worked for me.  Once I mastered it, it was fairly simple, although time consuming.  The time was well spent because I LOVED the end product!

Wednesday, 21 November 2012

Cake Pops til I drop

For the past 2 months I seem to have been on a cake pop making mission! It started at the beginning of October when I was asked to create some Bakers inspired cake pops and then help style a shoot for an advertorial. The brief was to create everyday cake pops as well as some Christmas specific ones. I was also asked to make and shoot a trifle but I’m really not a fan of soggy biscuits, so I’ll just pretend it was only cake pops. 

The December issue has just hit the shelves and the advertorial looks amazing. My cake pops (and trifle) look stunning thanks to the amazing photography skills of Rikki Hibbert. Below are a couple of photo’s of the cake pops that I took after the shoot as well as the final two page spread that is in this months issue of Good Housekeeping.


The end product!

No sooner had the photo shoot ended, when I began preparing cake pops for the Bakers stand at the Baby Indaba in Sandton.


Sprinkles table at the Bakers stand


Bakers inspired cake pops


Baby indaba done, and I was asked to make 300 cake pops for a function at AVI. Due to the magnitude of cake pops I had to make, and knowing that I also needed to make 300 mini cheesecakes, I decided to do upside down cake pops. They’re much faster to make, but still look incredible. On the day of the function, they were placed on trays and promoters handed them out, so in the end the upside down ones worked the best.


Cake Pops chilling in the fridge before being covered
Sitting on the promoters trays

Last week was the final cake pop project for the near future. I was asked to create a cake pop birthday cake with 60 cake pops and a small cake on top. I decided to do a blue and green theme, and due to the heat I decided that the best option was to make upside down cake pops again. The last thing I needed was the cake pops sliding off the sticks. I planned how I wanted it to look but only assembled the cake on delivery. I could never have imagined what the final cake would look like. I was so unbelievably happy with the end result as was the birthday girl.


Cake Pop Cake
 And now I’m going on a cake pop sabbatical!


Wednesday, 3 October 2012

One worm for a one year old


A year ago my nursery school friend had a surprise baby shower in anticipation of the arrival of her baby.  I was asked to please make some cupcakes for the party (something I never mind doing).  Knowing that she was expecting a boy made my decorating decision very easy – obviously blue, and then I decided to decorate the cupcakes with buttons.
  
Cole has just celebrated his 1st birthday and Claire asked me to please make some buttons for the birthday cake and cupcakes.  The party theme was primary colours and included a multi coloured worm.  Along with the buttons, I was asked to please make a worm for the cake, and Claire took on the task of making the cake.

So last week I sat down to some serious button making!  200 buttons and one worm later, I was very excited to see how the cake would look. The primary colours looked amazing and made a nice change to the pastels that I normally use.

After an interesting drive to deliver the worm, it finally made it onto the cake!


Wednesday, 8 August 2012

Daisy cake

A few weeks ago, I was sent a photo of a cake by Martha Stewart and was asked if I could recreate it in pink for a christening.  It wasn’t the first time I’d seen this photo – my friend Stacey is obsessed with this cake and has been wanting to make it for years ( really not an exaggeration, I think she emailed me this photo in 2007). So it was a very easy decision to accept this cake order, and I made it as much for me as for Stace.

The original cake by Martha Stewart


Daisies waiting to dry

In the same week that this cake was due, I received an order for another 1000 dog bone biscuits, so I had to be fairly organised in my execution.  My first task was to make the daisies so that they would have enough time to dry.  I have no idea how many daisies I ended up making – I sat down with   “The Proposal” on in the background and starting cutting.  So I made daisies for as long as it took for Sandra and Ryan to almost get married by ‘Ramone’ and hoped that there would be enough.  I’m guessing there were about 250 daisies.


Stacked, covered and ready to be decorated


I let the daisies dry for two days while I carried on with the dog bones and then set about making the cake. The cake was just a vanilla sponge with a strawberry buttercream filling (yum!) and covered in vanilla buttercream and pink fondant. I really didn’t relish the idea of having the cake starting to collapse en route to the christening so I iced each tier on its own board and used skewers in the bottom two tiers as an extra precaution.


I was very excited to start decorating the cake, although less so when my daisies starting sliding down the sides of the cake!  Once I got the royal icing consistency right, it went fairly quickly and I was relieved that I had just enough flowers (even after some sadly didn’t make it due to broken petals).


It didn’t turn out exactly like the yellow Martha Stewart cake, but it was never going to.  It was good inspiration to make a new, unique cake.  And yet again, something pink and white for this blog.  I think I better make something multi coloured next time just to add some colour.

Monday, 23 July 2012

Mini flower cakes

Last week while I had some time on my hands, I decided to make some mini cakes decorated with fondant.  I love working with fondant and just think it looks amazing on cakes, but I don't use it too often.  The base for my cakes was simple vanilla cakes iced with butter cream, i wanted to do something quick so i could focus on the decorating.

For the first cake I just cut out three different sizes of flowers and then planned to cover the entire cake. I've seen this idea a couple of times and just think it looks beautiful. I totally underestimated how many flowers I would need, so I just had to improvise.  I covered the side of the cake completely and then dotted the last few flowers on top.  I was so happy with the way it turned out, and when I put the finishing dusting of glitter on it I was sad that I hadn't made it for a specific reason other than to sit in my kitchen and get eaten!


The second cake was inspired by an idea I saw on Pinterest, I loved the flowers so decided to attempt to make them using my scalloped edge cutters. I also underestimated how many flowers I would need for this cake, but this time round I couldn't just improvise. Luckily they're so quick to make so I cut out some more rounds and quickly had enough flowers. I also discovered that these flowers can easily be made while talking on the phone! Once I had enough flowers I secured them onto the cake using some pearl pins that I had, and the sides of the cake just got a couple of spots to finish them off.


I was so happy with how both the cakes turned out and had just as much fun taking photo's and sampling the final product!