Monday 10 December 2012

Newly aquired draping skills


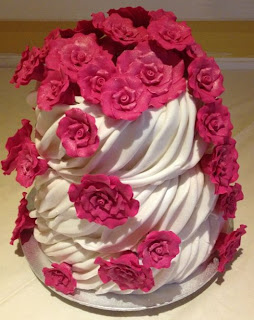
Two months ago I was asked to quote on an engagement cake.  I sent samples along with the quote and was promptly given the job of making a three tiered cake, draped with fondant and decorated with pink roses.

Cake with edible roses
Having never draped a cake before, I was quite excited to teach myself a new skill.  This past weekend was the delivery date and so the task began.  First step was obviously baking the cakes - the bottom tier is carrot cake, the middle is red velvet and the top tier is lemon cake.  Once the baking was done, the fun began.

I started with the smallest tier and after trying various techniques I finally settled on one that was worked for me.  Once I mastered it, it was fairly simple, although time consuming.  The time was well spent because I LOVED the end product!

Wednesday 21 November 2012

Cake Pops til I drop

For the past 2 months I seem to have been on a cake pop making mission! It started at the beginning of October when I was asked to create some Bakers inspired cake pops and then help style a shoot for an advertorial. The brief was to create everyday cake pops as well as some Christmas specific ones. I was also asked to make and shoot a trifle but I’m really not a fan of soggy biscuits, so I’ll just pretend it was only cake pops. 

The December issue has just hit the shelves and the advertorial looks amazing. My cake pops (and trifle) look stunning thanks to the amazing photography skills of Rikki Hibbert. Below are a couple of photo’s of the cake pops that I took after the shoot as well as the final two page spread that is in this months issue of Good Housekeeping.


The end product!

No sooner had the photo shoot ended, when I began preparing cake pops for the Bakers stand at the Baby Indaba in Sandton.


Sprinkles table at the Bakers stand


Bakers inspired cake pops


Baby indaba done, and I was asked to make 300 cake pops for a function at AVI. Due to the magnitude of cake pops I had to make, and knowing that I also needed to make 300 mini cheesecakes, I decided to do upside down cake pops. They’re much faster to make, but still look incredible. On the day of the function, they were placed on trays and promoters handed them out, so in the end the upside down ones worked the best.


Cake Pops chilling in the fridge before being covered
Sitting on the promoters trays

Last week was the final cake pop project for the near future. I was asked to create a cake pop birthday cake with 60 cake pops and a small cake on top. I decided to do a blue and green theme, and due to the heat I decided that the best option was to make upside down cake pops again. The last thing I needed was the cake pops sliding off the sticks. I planned how I wanted it to look but only assembled the cake on delivery. I could never have imagined what the final cake would look like. I was so unbelievably happy with the end result as was the birthday girl.


Cake Pop Cake
 And now I’m going on a cake pop sabbatical!


Wednesday 3 October 2012

One worm for a one year old


A year ago my nursery school friend had a surprise baby shower in anticipation of the arrival of her baby.  I was asked to please make some cupcakes for the party (something I never mind doing).  Knowing that she was expecting a boy made my decorating decision very easy – obviously blue, and then I decided to decorate the cupcakes with buttons.
  
Cole has just celebrated his 1st birthday and Claire asked me to please make some buttons for the birthday cake and cupcakes.  The party theme was primary colours and included a multi coloured worm.  Along with the buttons, I was asked to please make a worm for the cake, and Claire took on the task of making the cake.

So last week I sat down to some serious button making!  200 buttons and one worm later, I was very excited to see how the cake would look. The primary colours looked amazing and made a nice change to the pastels that I normally use.

After an interesting drive to deliver the worm, it finally made it onto the cake!


Wednesday 8 August 2012

Daisy cake

A few weeks ago, I was sent a photo of a cake by Martha Stewart and was asked if I could recreate it in pink for a christening.  It wasn’t the first time I’d seen this photo – my friend Stacey is obsessed with this cake and has been wanting to make it for years ( really not an exaggeration, I think she emailed me this photo in 2007). So it was a very easy decision to accept this cake order, and I made it as much for me as for Stace.

The original cake by Martha Stewart


Daisies waiting to dry

In the same week that this cake was due, I received an order for another 1000 dog bone biscuits, so I had to be fairly organised in my execution.  My first task was to make the daisies so that they would have enough time to dry.  I have no idea how many daisies I ended up making – I sat down with   “The Proposal” on in the background and starting cutting.  So I made daisies for as long as it took for Sandra and Ryan to almost get married by ‘Ramone’ and hoped that there would be enough.  I’m guessing there were about 250 daisies.


Stacked, covered and ready to be decorated


I let the daisies dry for two days while I carried on with the dog bones and then set about making the cake. The cake was just a vanilla sponge with a strawberry buttercream filling (yum!) and covered in vanilla buttercream and pink fondant. I really didn’t relish the idea of having the cake starting to collapse en route to the christening so I iced each tier on its own board and used skewers in the bottom two tiers as an extra precaution.


I was very excited to start decorating the cake, although less so when my daisies starting sliding down the sides of the cake!  Once I got the royal icing consistency right, it went fairly quickly and I was relieved that I had just enough flowers (even after some sadly didn’t make it due to broken petals).


It didn’t turn out exactly like the yellow Martha Stewart cake, but it was never going to.  It was good inspiration to make a new, unique cake.  And yet again, something pink and white for this blog.  I think I better make something multi coloured next time just to add some colour.

Monday 23 July 2012

Mini flower cakes

Last week while I had some time on my hands, I decided to make some mini cakes decorated with fondant.  I love working with fondant and just think it looks amazing on cakes, but I don't use it too often.  The base for my cakes was simple vanilla cakes iced with butter cream, i wanted to do something quick so i could focus on the decorating.

For the first cake I just cut out three different sizes of flowers and then planned to cover the entire cake. I've seen this idea a couple of times and just think it looks beautiful. I totally underestimated how many flowers I would need, so I just had to improvise.  I covered the side of the cake completely and then dotted the last few flowers on top.  I was so happy with the way it turned out, and when I put the finishing dusting of glitter on it I was sad that I hadn't made it for a specific reason other than to sit in my kitchen and get eaten!


The second cake was inspired by an idea I saw on Pinterest, I loved the flowers so decided to attempt to make them using my scalloped edge cutters. I also underestimated how many flowers I would need for this cake, but this time round I couldn't just improvise. Luckily they're so quick to make so I cut out some more rounds and quickly had enough flowers. I also discovered that these flowers can easily be made while talking on the phone! Once I had enough flowers I secured them onto the cake using some pearl pins that I had, and the sides of the cake just got a couple of spots to finish them off.


I was so happy with how both the cakes turned out and had just as much fun taking photo's and sampling the final product!


Monday 9 July 2012

Every dog bone has its day!

My latest baking challenge came by default and not design.  Nowhere on my list of things to bake was 1000 individually branded biscuits shaped like dog bones! 
I was midway through icing a chocolate cake when I got the call to confirm the order and quantities.  After calmly accepting the order, I put the phone down and in an equally calm manner, without thinking what I was doing, placed a large spoonful of chocolate icing in my mouth.  Once I registered what I’d done, I justified the icing in that it helped me think straight.
And so the game of logistics began.  After a highly entertaining conversation in Woolworths explaining to the cashier why it was that I needed  12kg’s of flour, 5kg’s of sugar, 30 eggs and 10 bricks of butter, I was ready to go. I had 6 days to make 1000 biscuits, which I broke down into 200 per day giving me an extra day should something go wrong. 


200 biscuits per day was completely doable and the baking turned out to go faster than I thought it would.  The time and patience came in individually packaging each biscuit.  I don’t have the most nimble fingers at the best of times, and after a couple of upside down and angled bows I can now tie the perfect bow in my sleep.


By Thursday the biscuits were done, each in a cellophane bag with a Sprinkles sticker, divided amongst 19 beer boxes and ready to go. 


My final challenge on Friday morning was to transport the biscuits to Pretoria.  Despite my initial conviction, I now know that 19 beer boxes definitely can’t fit into a VW Polo! After some car juggling, taking a wrong turn, and one fallen down box of biscuits (none broken) my biscuits where handed over. On delivery, the first comment I got was, ‘Flip, that’s a lot of biscuits’.  ‘Um, I know – I made every single one!’


It might not have been one of my goals, but at least now the challenge of making 1000 biscuits in 5 days can be added to my list and ticked off!


Monday 18 June 2012

Thanks to London


Last December, my sister and I walked the whole of London in a day. I don’t want to exaggerate, maybe not the whole of London, probably about 95%. Its 6 months later and there are two things that’s stand out from our time in London… 1. Just how far we walked that day and 2. The delicious raspberry white chocolate square we treated ourselves to as our reward for walking so far.
Our plan had been to have a quick coffee and carry on walking.  But the plan rapidly changed as we set eyes on the beautiful white squares sitting in the display case just begging to be eaten.  We bought one to share and quickly regretted the decision!   With each bite we mentally deconstructed it so that we could recreate it when we got home.  Luckily for us it came from a little coffee shop called Starbucks, so we knew there would be plenty more taste testing opportunities.

So continuing with my list of things I want to make, number 2 was the amazing Raspberry white chocolate squares and a recent addition to the list was Petit Fours.  In my head, recreating the squares encompasses both of them so I can now tick them both off.
In theory it should have been quite easy to make, but to match a flavour profile from only photo and a 6 month old memory was a bit of a challenge.  Once the flavour was right, the actual coating of the cake took some skill.  I wish it was an elegant process, but the first few attempts resulted in me having chocolate dipped hands with minimal coating on the cake.  But finally through pure trial and error, I think I have them as close to my memory as possible. 

Now that I've matched it, I think the only next logical step is for me to return to London to make sure they taste exactly the same!

Tuesday 22 May 2012

A piece of Paris in my kitchen

What better way to start my blog than by setting myself a bit of a challenge?  I have an ever growing list of things I’d like to attempt to create and number one on the list is macaroons.  After a couple of friends recently asked me if I could make them (and I obviously said yes), I decided I better see if I actually could!  It’s not like they’re one of the hardest things to make or anything.
The mere mention of macaroons elicits images of perfectly round, pastel coloured treats packaged in beautiful boxes with a hint a Paris surrounding them.  Before last week if anyone mentioned the greatness of macaroons to me all I envisioned  was a sorry bag of crumbs that seemed to have taken a much bumpier flight home from Paris than I had!  Sorry for macaroons, but after that they never really got another chance with me.
But now it was time to give them another chance. So I set about finding the perfect recipe.  Lesson one in macaroon making…  It is in fact spelt macarons, so if all else failed, at least I got a spelling lesson out of this!
I found a recipe in the Ideas magazine and judging the recipe by its picture (as I always do), I decided that this would be the winner. How hard could it be to recreate the picture??  Apparently harder than I thought! 
Round 1 was disastrous for everyone expect my dog Crumpet who thoroughly enjoyed the multi-coloured wannabe macarons. I could tell before I even put them in the oven that they weren’t going to work, the texture was very wrong for something that needed to be light and crispy. Both the recipe and remaining macarons went into the bin and my search continued. 
I looked a while to find another ‘perfect’ recipe but eventually settled on Martha Stewart’s recipe for Parisian macarons. After deciding to focus on just one colour instead of creating a rainbow of macarons, round 2 went much better. That is until I put them into the oven and my beautiful macarons decided to join forces to become one.  On the plus side, they tasted much better than my first attempt and looked pretty good.  The recipe was right but it just needed some fine tuning.


Before attempting round three I decided I needed some help, so I went and bought a macaron sheet.  Ok, so it’s a bit of a cheat sheet, and I bet they don’t use them in Paris.  But this is Joburg and I wasn’t going to let the macarons beat me.  Apparently this was the final ingredient I needed in order to make the perfect macaron!


After waiting for them to set for an hour, I carefully placed them in the oven and hovered around for 20 minutes watching my perfect macarons evolve.  Absolute perfection came out of the oven, finished off with white chocolate ganache resulting in the pure deliciousness that people always talk about. Macarons aren’t impossible to make, they just require a bit of patience. 

 
 Next time I’m in Paris I’ll definitely eat my macarons as soon as I buy them and rather bring home one of those super cool Eiffel tower key rings as a memento – they travel much better!